As a special thank you, now purchase a ZMR frame or an ARF package, including ZMR-X210, ZMR X-Lite, ZMR180 and ZMR250 V2, you will receive a free FPVModel pilots hat (while stocks last).
The ZMR mini quads from FPVmodel.com are designed by FPV racers for FPV racers. They are all made of the best 3K carbon fiber around and backed by FPVmodels reputation. For any questions regarding to the ZMR mini quads, you can join the discussion in ZMR250 V2 flyers Group at facebook.
* Two styles of hat available, will send at random.
For a limited time, FPVModel offers the RaceGates at a great discount up to 39% off.
FPVModel RaceGates give the racers the ability to map their tracks out with ease using this simple design that can be setup in minutes. Using the simplicity of collapsable tent poles and Polyester Oxford 210D fabric, these gates come in a handy carry along bag, giving you the freedom to race anywhere in just a moments notice.
For the Big Arched RaceGates, the arched design and angled base allows for the gates to unflod and be setup using a set of ground stakes to allow it to freely stand in the air, therefore, eliminating the need for a secondary supporting system.
The new arched RaceGates are meant for our more budget oriented custumers and will price easier to transport. They also feature the same style of eyelet of previous version FPVModel RaceGates for ensuring a strong setup for use of guide lines when it is windy outside.
The Ring RaceGates add challenge for racing, but also a lot of fun.
FVT is at it again and with their latest offering you’ll be finding that they have followed the BLHeli S craze and came out with a small form factor ESC with 25A burst capability!
These Little Bee 20A BLHeli SESCs are compatible with the latest BLHeli S code and are designed to give you excellent performance with minimal out of pocket costs. Keeping up with the trend of better performance the guys at BLHeli have changed some of their code and this change in code requires a change in hardware so Little Bee have upped their game to keep up with the changing times. Using different MCUs is the way they’ve had to keep up with the changes and no longer are the focused on software pwm...the updated MCUs are now featuring hardware PWM that is synced to the duty cycle and this give these new ESCs the ability to write the values to the motors at double the speed when comparing to software pwm.
Here’s what SSKAUG has to say about the improvements: BLHeli_S is an improved version of the base BLHeli code.
BLHeli_S delivers a throttle response that is Smooth as Silk, and the main factor contributing to this, is that it uses hardware to generate motor PWM. Two MCUs support this for BLHeli_S, namely the BusyBee1 at 24MHz (EFM8BB10F8) and the BusyBee2 at 48MHz (EFM8BB21F16).
BLHeli_S will have the same good Sync holding properties as base BLHeli. Maybe even better.
BLHeli_S generally does Startup better than base BLHeli.
BLHeli_S does damped light. Only.
BLHeli_S has motor PWM that is Synchronous to the MCU master clock, as it is generated by hardware. This makes the motor Silent.
BLHeli_S has very Small throttle Steps. The resolution varies between hardware configurations (MCU clock speed and driver type), and is between a nominal 512 steps and 2048 steps.
BLHeli_S supports very high motor Speeds. A BB1 MCU will support 350k erpm, and the limit of the BB2 is not yet known, so the code is set to limit at 500k erpm.
BLHeli_S supports regular 1-2ms input signal, as well as Oneshot125, Oneshot42 and Multishot. Autodetected when the ESC sees an input signal.
Last and by no means least, is Simplicity. If you have a regular setup, just install and go fly (calibrate if your throttle range does not match BLHeli_S default). Or if you need to configure or update, just do so with the Simplicity offered by connecting to your ESCs through the FlightController, using BLHeliSuite and a USB cable.
ESCs will be available from several manufacturers in not too long.
Built around the open source Pro Diversity open source design for a dual diversity setup with a large design footprint with good separation between modules and better heat dissipation, this all in one package is designed to give you great signal reception rather you are flying long range or inside confined indoor tracks and need help dealing with likely multipathing issues.
FPVModel 5.8G Explorer Dual Diversity Receiver features an OLED display (Organic Light Emitting Diodes), automatic channel scanning, spectrum analyzer, and built-in dual diversity receivers. All of the features are controlled via a main jog wheel that enable the user to navigate the menu and sub screens with ease.
Here’s a list of features that can be controlled via themenu system:
SCANNER Scan the spectrum of all 40 channels forFPV usage.
Jog Wheel Navigation Three way navigation wheel. Up, down, pushinward.
Search Mode Search channel based on strength.
Manual Mode Set the channel manually.
Save Channel This feature allow the system to start upwith the last used channel being saved into memory.
Pilot Display This screen displays call sign, signalstrength, and shows current used receiver.
Settings Menu Set call sign name, calibrate RSSI, selectfrequency order, save channels.
Dual Diversity
FPVMODEL 5.8G Explorer features two built-in receivers and this will give the user an additional level of protection and allows for combining antennas that can be used to suit the given application such as directional and omni-directional, allowing for great signal reception rather you are flying near and around yourself or going for long range and need that directional antenna to get you there. The two modules work together and do not need any special adjustments to be completed by the user, simply put they just work together.
In conclusion this package is designed to give the user an affordable alternative to a clear view of their FPVfeed. Small enough to travel with and large enough for good antenna separation this package will give you the sight you need while you’re up in the air, find it at fpvmodel.com and get yours today.
The ZMR-X210 is an evolution of the ZMR design, in keeping up with the changing times this ZMR was re-worked from the ground up. We are not just modifying the arms to give a "X" type of layout, we have re-worked it entirely to provide what the modern user wants.
ZMR-X210 features an X design which is currently the most popular mini quad layout. This mini quad frame has nothing like the old ZMR250 and it was created from the ground up.
First thing that I noticed during unboxing was how well the frame was packed. All carbon parts were packed separately so there was no way for the carbon to get scratched, All hardware was in different bags, which made it easy to sort the screws needed for the build.
I do like to say I am very impressed with the carbon and how it looks, with no jagged edges.
Weight: 97g carbon fibre parts without hardware – 145g assembled.
Quick Release Fixings
One great feature is the what I would call “Quick Release Fixings” aluminium mounting hardware, it allows you to swap out arms more quickly. Basically they are threaded spacer that are shared by multiple bolts, when you unscrew one bolt the spacer will still be supported by other bolts and stay where they are, therefore you only need a screw driver and no pliers required. You don’t even need to remove the top plate to change arms any more.
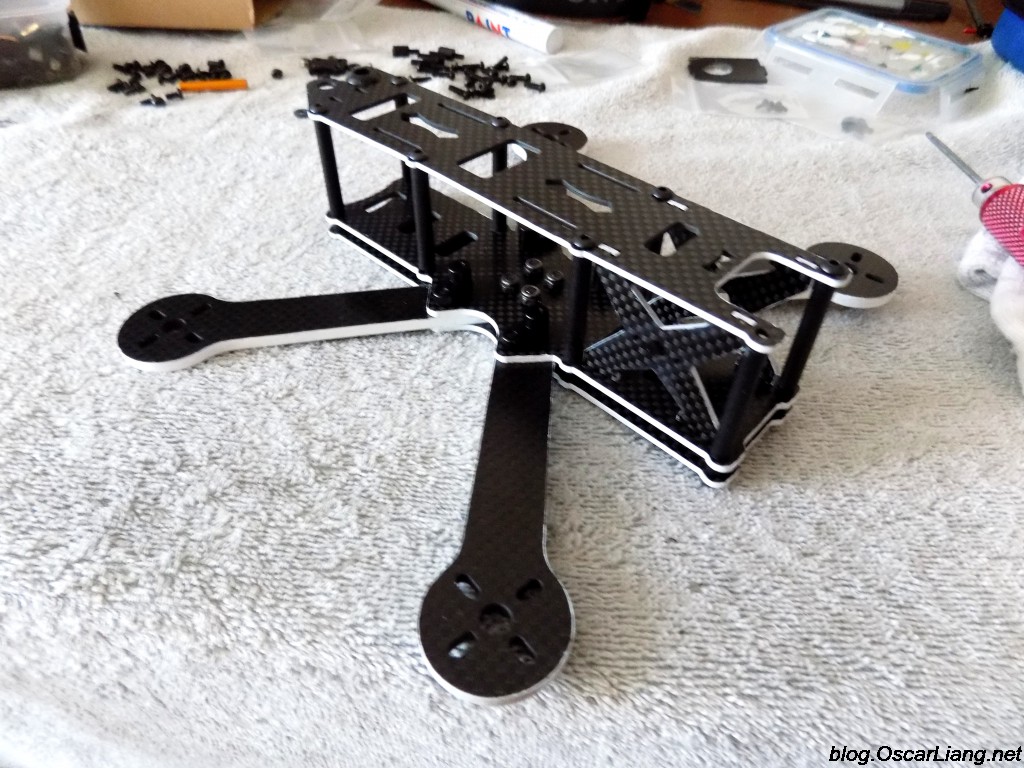
I started to build and attach the arms using the quick release fixings when I came across the centre fixing for the arms wouldn’t screw into mount, after examination and removing the arms, i found the mount that holds the middle screws for the arms, the holes didn’t line up (below picture).
So without getting the Dremel out to drill the carbon and make the holes too big I scrapped the mount, and just used M3 locking nuts , only issue with doing this is you can’t do a quick swap if you break an arm, so that is the first negative point I found , hopefully they will sort this out soon.
Arms
They have done a nice touch with the spacers that are used between the 2 bottom plates: the spacers are threaded, and you don’t lose the screws and spacers, when the standoffs are removed for any reason.
The ZMR X210’s arms are sandwiched by a double bottom plate structure like the good old ZMR250. However on this design you can optionally use only 1 bottom plate to save weight, the trade-off would be reduced strength against crashes.
Comparing to the good old ZMR250 arms.
2 Camera Options
Similar to the DemonRC NOX5, you get 2 different options of FPV camera mounting.
This is the for cameras with a case.
And the mounting plate is for board cameras.
Building
Finally after fully building the ZMR-X210, I found the 2nd mistake to this frame.
I painted the edges of the carbon fibre with white colour “Tyre Marker”. You can also use nail polish but tyre marker is easier IMO.
3 standoffs wasn’t threaded enough to take the screws provided, so in the end I had to use washers as I never had M3 screws that was short enough.
Here is the parts list I used in this build:
Naze32 Rev6
Littlebee 20a
Skyzone TS5823 200mw
Fatshark 700tvl FPV camera (Metal Cased)
T-motors MN2204/2300kv
Props: DAL 5×4.5×3 V2
Delta8 PPM RX
Picture of it fully built:
The next issue I had was when installing the motors to the arms (t-motor 2204/2300kv) I found that you have to be perfect with the lining of the shaft as the C-clip rubs the whole drilled in the arm. But with cobras and many other motors that should not be an issue.
After that the frame was a joy to build with no other problems, the frame is nicely designed and has some similar looks to the Lumenier raceblade. No where near the same but some nice touches and detail to attention on this frame.
Pro’s and Con’s
Positives
The frame looks strong and carbon is cut very good indeed, I was impressed and I think it’s worth the money if the few negatives get sorted out
Clever solution for quick arm release, and some nice touches for simple fixing and breakages
Negatives
Unless it was just the one I received but the holes on the quick release fixing for the centre of arms don’t line up
The standoffs thread needs to be tapped deeper, at least the length of the screws provided
And may be the holes where the shafts sit on the arms need to be 1mm 1.5mm bigger
Overall the frame is a nice looking frame and well worth a buy imo
FPVModel.com is happy to annouce that the X-Racer F303 flight controller is newly released. X-Racer was designed for the serious racer. We have followed the idea of simplicity and kept the basic rugged design of servo style pinouts so you dont have to worry about the fragility of plastic connectors in a crash.
This X-Racer flight controller only comes in one version...ACRO! This is not a flight controller that is designed to fit the needs of everyone, it is a flight controller designed to fit the needs of racers and free style flyers.
X-Racer backed by FPVMODEL's reputation giving you a flight controller you can trust.
FEATURES:
Built in high capacity black box featuring 16mb flash memory. This will allow you to store an entire days worth of flights while you are out in the field burning through multiple batteries and flights. Next generation F3 processor for efficient flight calculations and those lower loop time youve been reading about.
The size of the flight controller follows the form thats so typical in all the others allowing you to mount to the majority of the frames out on the market without the need of changing mounting holes on most base plates.
8 PWM I/0 lines for ESCs and added options you may choose.
Supports Sbus, SumH, SumD, Xbus, PPM, PWM recievers but has a recommended and weight saving direct connection specifically for Sbus, which is our recommended connection for flight control.
Buzzer port for audible lost model location.
Convienent pin outs for easy, reliable soldering.
Only available in Acro style, no barometer or magnetometer.
SOFTWARE:
The X-Racer flight controller runs on the open source Cleanflight software and its compatible with the Boris B. Betaflight firmware. The hex file to use is spracingf3 hex.
WARNINGS:
Failure to adhere to these warnings will void your warranty and destroy your flight controller.
Observe polarity at all times. Double check all connections before applying power. It is very common for users to accidentally reverse polarity, try not to let it happen to you.
After double checking all connections its a good idea to triple check connections...positive to positive, negative to negative.
Make certain all channel inputs match corresponding outputs or else undesired flight characteristics will happen.
FPV Model has just upgraded its ZMR250 frame from V2 to V2.1. The new frames come with angled camera plates, and available in different colors, including black, silver, red, gold.
The reason of this change is to make ZMR250 V2 a more suitable multirotor for FPV during racing. However, the V2 is still available for sale as some pilotrs prefer straight camera plate.